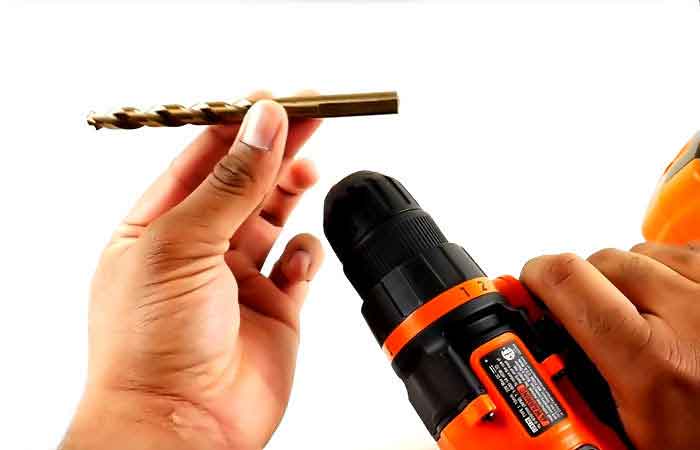
Knowing how to change a drill bit is an essential skill for anyone who works with power tools. It allows you to switch between different types and sizes of drill bits, enabling you to tackle a wide range of DIY projects with ease. Additionally, it can help you save time and money by avoiding the need to purchase multiple drills for different tasks.
In this article, we will provide a step-by-step guide on how to change a drill bit. We will cover the safety precautions you need to take before starting, the tools and equipment required, how to remove the old drill bit, choosing the right drill bit for your project, installing the new drill bit, and testing the new drill bit.
If you are someone who enjoys DIY projects or just wants to be more self-sufficient, this guide is for you. With our easy-to-follow instructions, you will be able to change drill bits with confidence and take on new challenges with your power tools.
How To Change A Drill Bit
Safety Precautions
When changing a drill bit, it’s important to take certain safety precautions to prevent accidents or injuries. Here are some key steps to follow:
- Always wear eye protection, such as safety glasses or goggles, to protect your eyes from flying debris.
- Make sure the drill is unplugged or the battery is removed before attempting to change the drill bit.
- Never touch the chuck or the drill bit with your bare hands, as they may be hot from use.
- Use a pair of pliers or a chuck key to loosen and tighten the chuck, rather than your hands.
- If you’re using a corded drill, make sure the power cord is not in the way and cannot be accidentally cut by the drill bit.
- Always read and follow the manufacturer’s instructions and safety guidelines for your specific drill model.
Removing the Old Bit
Removing the old drill bit is the next step in the process of changing a drill bit. Here’s how to do it:
- Make sure the drill is unplugged or the battery is removed to prevent any accidental start-up.
- Identify the type of chuck on your drill. Most drills have either a keyless chuck or a keyed chuck.
- If your drill has a keyless chuck, hold the drill with one hand and use your other hand to twist the chuck counterclockwise to loosen it. Once the chuck is loose, you can remove the old drill bit by pulling it straight out of the chuck.
- If your drill has a keyed chuck, insert the key into the hole located at the base of the chuck. Turn the key counterclockwise to loosen the chuck. Once the chuck is loose, you can remove the old drill bit by pulling it straight out of the chuck.
- If the old drill bit is stuck or difficult to remove, try using a pair of pliers to grip the bit and twist it counterclockwise while pulling it out of the chuck. Be sure to hold the drill with your other hand to prevent it from moving.
Selecting the Right Bit
Selecting the right drill bit is an important part of changing a drill bit. Here are the steps to follow:
- Determine the size of the hole you need to drill. The size of the hole will determine the size of the drill bit you need to use. You can use a ruler or a tape measure to measure the diameter of the hole.
- Determine the type of material you will be drilling into. Different materials require different types of drill bits. For example, wood requires a different type of drill bit than metal or concrete.
- Choose the appropriate drill bit for the material you will be drilling into. Drill bits come in a variety of materials, including high-speed steel, cobalt, and carbide-tipped. Each material has different properties that make it more suitable for drilling into certain materials.
- Consider the length of the drill bit. If you need to drill a deep hole, you will need a longer drill bit. If you only need to drill a shallow hole, a shorter drill bit will suffice.
- Consider the shape of the drill bit. Some drill bits have a twisted design, while others have a spade or paddle shape. The shape of the drill bit will affect the speed and accuracy of the drilling process.
Inserting the New Bit
Once you have removed the old drill bit and selected the new one, it’s time to insert the new drill bit into the chuck. Here are the steps to follow:
- Hold the drill with one hand and use your other hand to open the chuck by turning it counterclockwise. Make sure the jaws of the chuck are fully open.
- Insert the shank of the new drill bit into the chuck. The shank is the non-cutting end of the drill bit that fits into the chuck. Insert the shank straight into the chuck as far as it will go.
- Tighten the chuck by turning it clockwise. Hold the drill bit in place with one hand while turning the chuck with your other hand. Continue tightening the chuck until the drill bit is secure and cannot be removed by hand.
- Double-check the tightness of the drill bit by giving it a gentle tug. If it moves at all, tighten the chuck a bit more until it is secure.
- If your drill has a keyed chuck, remove the key from the chuck and set it aside. If you have a keyless chuck, you’re ready to move on to the next step.
Testing the New Bit
Before you begin drilling with the new bit, it’s important to test it to make sure it is properly installed and functioning correctly. Here’s how to do it:
- Turn on the drill and run it at a low speed. This will help you check that the drill bit is spinning smoothly and without any wobbling or vibrations.
- Hold the drill bit up to a light source and check that it is straight and not bent. A bent drill bit will not drill a straight hole and may cause the bit to break or become damaged.
- Check the alignment of the drill bit with the drilling surface. Make sure the bit is perpendicular to the surface and not at an angle.
- Make a small test hole in a scrap piece of material. This will help you determine whether the drill bit is suitable for the material you are drilling into and whether it is working properly.
- Finally, listen to the drill as it operates. If you hear any unusual noises or sounds, stop the drill and check the bit to make sure it is properly installed and functioning correctly.
FAQs
What types of drill bits are available in the market?
Answer: There are many types of drill bits available, including twist bits, spade bits, hole saws, masonry bits, and step bits. Each type of bit is designed for different drilling applications.
Can I use a different brand of bits with my drill?
Answer: Yes, you can use a different brand of bits with your drill as long as they are the correct size and type for your drill.
What if the bit won’t come out of the chuck?
Answer: If the bit won’t come out of the chuck, try using a pair of pliers to grip the bit and twist it counterclockwise while pulling it out of the chuck. If that doesn’t work, you may need to take the drill to a professional for repair.
What if the new bit won’t tighten in the chuck?
Answer: If the new bit won’t tighten in the chuck, make sure the bit is the correct size and type for your drill. If it is, try cleaning the chuck and the bit with a clean cloth to remove any debris. If the problem persists, you may need to take the drill to a professional for repair.
How do I know if the drill bit is dull or worn out?
Answer: A dull or worn-out drill bit may produce a rough or uneven hole, or it may take longer than usual to drill through the material. You may also notice that the bit produces more heat than usual or begins to smoke.
What safety precautions should I take when using power tools?
Answer: When using power tools, it’s important to wear eye and ear protection, avoid loose clothing or jewelry, and follow the manufacturer’s instructions and safety guidelines. You should also keep your work area clean and well-lit, and never leave a power tool unattended while it is still running.
How do I choose the right drill for the job?
Answer: To choose the right drill for the job, consider the type of material you will be drilling into, the size of the hole you need to drill, and the power and speed of the drill. You should also consider the type of chuck and the size and type of drill bit that is compatible with the drill.
What are the different types of drills and their uses?
Answer: There are many types of drills available, including corded drills, cordless drills, hammer drills, and impact drills. Each type of drill is designed for different drilling applications, and some are more powerful or specialized than others.
Final Words
Congratulations, you’ve reached the end of our ultimate guide on how to change a drill bit! By following the steps we’ve outlined, you should now be able to safely and confidently change a drill bit on your own, no matter what type of drill or bit you’re working with.
Remember, the key to success is to take your time, follow the proper safety precautions, and choose the right drill bit for the job. With a little practice, you’ll be able to change drill bits with ease and take on all kinds of DIY projects around your home.
If you have any additional questions or concerns about changing a drill bit, don’t hesitate to reach out to a professional for guidance. And as always, be sure to share your tips and experiences with others who may be learning how to change a drill bit for the first time.
We hope this guide has been helpful to you and wish you the best of luck with all your drilling projects!


